|
[Introduction]
Virtual Classroom is a simulated
classroom via Internet, which provides a convenient communication environment
for distance learners just like traditional face-to-face style
classroom.
As well as traditional classroom, virtual
classroom is teacher-dominated. Students could not change webpage/video/audio
shown in classroom unless they get the permission from teacher.
Before using teacher toolkit, a user name (usually First Name and Last Name)
and password will be given by tool provider.
Briefly, following functions are ready to go
with teacher toolkit:
-
Online Communicating with students in classroom using Text or Audio Messages.
-
Pushing Webpage/Video/Audio to students.
-
Drawing diagrams on white board and showing
them to students.
-
Managing (Granting / Revoking) pushing
permission of students, which could let students lead a discussion or
make a presentation.
-
Managing information of students in class and
sending group Emails (may include personal Grade
Vector) to each student.
[Minimum System
Requirement]
-
Intel Pentium processor
-
Microsoft Windows 98 Second Edition, Windows
Millennium Edition, Windows NT 4.0, Windows 2000, Windows XP
-
32MB of RAM (64MB recommended)
-
10MB of available hard-disk space
-
Internet Explorer 6.01 or
Higher
-
Microsoft Office 2000/XP
Installed. (For exporting grade sheet to Excel)
[Installation]
Step1. Download/Copy Installation package
from provider, for example, teacherinstall.exe.
Step2. Double click to run it. Follow installing instruction step by step.
Step3. Once finished Step2, a
new program named "Virtual Classroom Teacher Toolkit" will be added into
programs group, which includes five tools shown as Figure1.

Figure 1. Installation
[Configuration]
Before first time using,
please Click Start--> Program-->Virtual
Classroom Teacher Toolkit-->Configuration Tool to set your
information correctly. The interface for configuration is shown in Figure 2.

Figure 2. Configuration
 Note:
In most cases, there is no need to change Name Server's address and Port unless
provider requires. SMTP Server is for Email sending service, Sever and
Port are common configurations as same as any universal Email clients such as
Microsoft Outlook. Name and Email are for sender's information shown on outgoing
messages to students. To avoid confusion of receivers, MAKE SURE to set them as your name and Email address
before using group email service. Note:
In most cases, there is no need to change Name Server's address and Port unless
provider requires. SMTP Server is for Email sending service, Sever and
Port are common configurations as same as any universal Email clients such as
Microsoft Outlook. Name and Email are for sender's information shown on outgoing
messages to students. To avoid confusion of receivers, MAKE SURE to set them as your name and Email address
before using group email service.
Note: Once press the
"update" button, all configuration will be saved.
[Getting Start]
Click Start--> Program-->Virtual
Classroom Teacher Toolkit-->Communication Tool (Figure 3)

Figure 3 Login To
Communication Tool
Next Window is asking you to choose
the classroom you want to enter (Figure 4).
Note: One teacher could
teach multiple classes, so more than one choices may be offered.

Figure 4 Choose Courses
 Trouble Shooting: If you get
message "Can't find Name Server", please use configure tool mentioned in
[Configuration] to set the name server's information. If the problem persists,
check to see if you are using any firewall software. In some cases, system
fails because communication port is blocked by a firewall. Opening the port or
disabling firewall could solve the problem. Trouble Shooting: If you get
message "Can't find Name Server", please use configure tool mentioned in
[Configuration] to set the name server's information. If the problem persists,
check to see if you are using any firewall software. In some cases, system
fails because communication port is blocked by a firewall. Opening the port or
disabling firewall could solve the problem.
Click Start--> Program-->Virtual
Classroom Teacher Toolkit-->Information Center:

Figure 5. Login to
Information Center
Next Window is asking
you to choose the classroom you want to enter, exactly as same as Communication
tool (Figure 4).
[Basic
Functions]
-
Online Communicating with students in classroom using Text or Audio Messages.

Figure 6 Chatting Room
There are text input areas located on
the left bottom of chatting room where user can input the text/audio message.
(Figure 6)
-
Click SEND (Ctrl+X) button to
send message to teacher and other students.
-
Click CLEAR button to
clear the input area.
-
Click SAVE button to
save the all the chatting history.
-
Click Color Bar to
choose the color of your message.
Note: by changing drop list "TO",
private talking is allowed between teacher and any student in classroom.
(Other students will not see the messages).
Note: The audio messages are allowed
by checking the audio box above text input field.
-
Pushing Webpage/Video/Audio to students.
There is a form on upper part of the
chatting room (Figure 6) which could let users push
Webpage/Video/Audio to students by
filling URLs into the appropriate text fields.
-
Drawing diagrams on white board and
showing them to students.
White board tool
on the right bottom of Chatting room (Figure 6). Choose the drawing tools on
the right side to draw a picture. (similar as Microsoft "Paint" Drawing
Tool). Different shapes and colors are available to choose.
-
Click
SEND
button to send diagram drawn to students.
-
Click
CLEAR button
to clear the drawing area.
-
Click
BACK
button to undo the current operation.
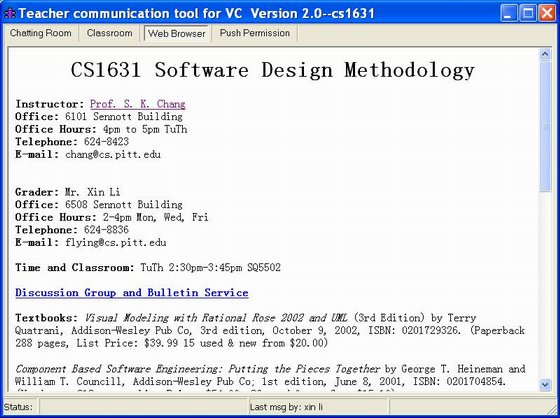
Figure 7 Embedded Web Browser
Note: As same as
student communication tool, a web browser is provided in teacher
communication tool as shown in Figure 7.
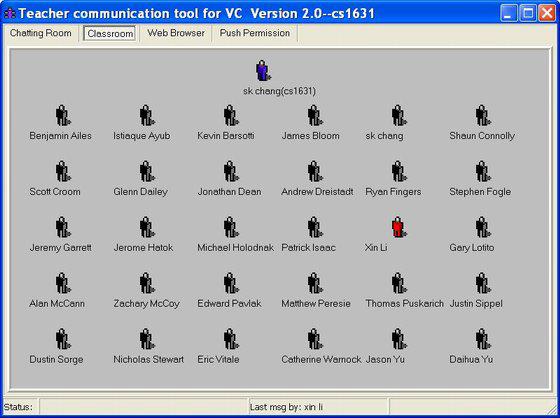
Figure 8 Visual Classroom
Click the page button CLASSROOM. A visual classroom will show up. Everyone (Teacher and Students) will have a avatar in this room ( Figure
8).
Highlight means
online.
Note: The images
for avatars in your system may be different from Figure 8. It depends on which version
you are using. Some versions provide an option to change icon.
-
Managing (Granting / Revoking) pushing
permission of students, which could let students lead a discussion or
make a presentation.
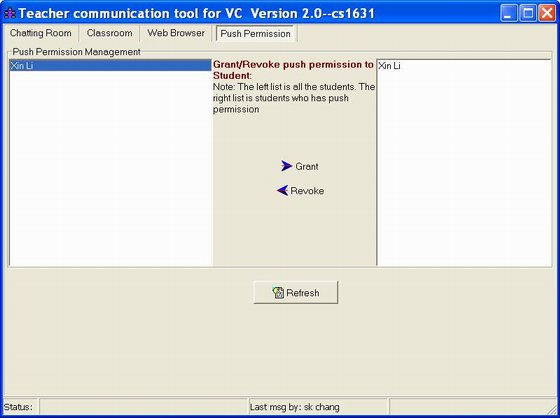
Figure 9 Pushing Permission
Management
As shown in Figure 9, the
left list is all the students online. The right list is the students who
have push permission. Once students get the push permission, they could
push Webpage/Video/Audio to teacher and other students. Meanwhile they
could send Audio message as well.
Note:
Teacher can revoke students' permission at any time. Teacher
may give multiple students push permission. ONLY online students can get push permission.
-
Managing information of
students in class (Figure 10)

Figure 10 Student
Information Management
Grades could be inputted into a
spreadsheet-style grid shown in Figure 10.
-
Click
Export
button to export all data into Microsoft Excel, in which user could easily
print, do some statistic and other advanced functions.
-
Click
Save
button to save the data.
Note:
Teacher may have different needs for student information. System provides maximum flexibility.
For the information of students, only following fields are required:
Beside these,
teacher may customize other fields, for example
{ex1,ex2,project1, project2} , {quiz1,quiz2,midterm,final} and so on. Please
send the format which you want to the software provider . They will set grade vector for your
class. The "information Center tool" will AUTOMATICALLY FIT the format.
-
Sending group Emails (may
include personal Grade Vector) to each student.

Figure 11 Sending Group Email
Use
check box list at the top left to select who you are going to send email.
All items listed in interface (Figure 11)
are similar as what you see in any universal Email clients such as
Microsoft Outlook. Furthermore, a personal grade vector could be inserted into
email by checking the box "Including the grades in the message". Once you finished, press SEND button. A preview email window will show
up (Figure 12):

Figure 12. Email Preview
You still have a chance to cancel the sending action by click "Opps...something wrong" button.
Trouble
Shooting: In case sending email address is rejected by SMTP server, an
exception message will list all invalid email addresses. All emails will be
cancelled even for correct emails in group. The reason for this
"all-or-nothing" policy is that at any time users could correct invalid emails
and try sending again, no worrying about duplicated emails for others.
[Un-Installation]
You may need to remove the teacher toolkit
from you computer. Here is some tips for Un-installation:
Click Start--> Program-->Virtual
Classroom Teacher Toolkit-->Uninstall. Follow the instructions.

Figure 13 Uninstallation
[Live Update]
A live update tool is provided
to download the latest version without re-install the whole system.
Click Start--> Program-->Virtual Classroom Student Toolkit-->Live Update,
a window will be shown as Figure 14.

Figure 14 Live Update Tool
By clicking "update" button, system
will automatically check availability of new version. If yes, it will
overwrite the current version by new one.
Questions and Comments, send them to
flying@cs.pitt.edu.
--End--
|
Updated:
04/12/2005 |
 |
|